
eFMLA - Step-by-Step Guide for Administrators - How To Start and Process FMLA Leave
Scroll down to start or click a link below to go directly to any step
- Step 1: Send Employee FMLA Leave Request Link
- Step 2: Complete Setup of EFI Profile
- Step 3: Create Eligibility and Rights & Responsibilities Notice
- Step 4: Create Medical Certification Form (if necessary)
- Step 5: Create Cover Letter (Optional)
- Step 6: Create Fitness for Duty/Return To Work Form (Optional)
- Step 7: Send or Print Forms and Notices to Employees
- Step 8: Complete and Send the Designation Notice
- Step 9: Manage Employees' Leaves
- Step 10: Manage Return to Work Email Reminders
- Step 11: Close the Employee's EFI Profile
STEP ONE: Send an Employee the FMLA Leave Request Link
When you find out that an employee needs leave for a potentially FMLA-qualifying reason:
Send the employee the FMLA Leave Request Form by clicking on Create a New Employee Profile
Optional: Self -Service FMLA Leave Request Link for Employees
Note: If you make the FMLA Leave Request Link available to employees through a webpage portal and the employee in need of leave already has submitted request for FMLA leave,
skip this Step, and proceed to Step Two.

From the Main Menu. The third option, Send an Employee the 'FMLA Leave Request' Link, is pre-selected.

Click Proceed and Fill in the Name, Email of Employee
• Enter the employee’s first name, last name and email address.
• Click “Submit.” If the information is correct, click the “Send Request” button. If the information is not correct, click the “Back” button and correct the information.

Alternatively: Administrators can Manually Enter the Employee information to Create Profiles/EFI for the Employee.
In situations when the Employee is unable to fill out a form, you can create the employee’s new Employee FMLA Instance (EFI) profile by clicking on “Create a New Employee Profile” for an employee who has not had any previous EFI’s or by clicking “Create a New FMLA Instance (EFI) from an Existing Employee Profile” for an employee who has had one or more previous EFI’s. You then will need to complete all required fields to complete the setup of the employee’s new EFI profile. Skip Step Two below.

Self -Service FMLA Leave Request Link for Employees
Note: If you make the FMLA Leave Request Link available to employees through a webpage portal and the employee in need of leave already has submitted request for FMLA leave, skip this Step, and proceed to Step Two.
STEP TWO: Setup the Employee's FMLA Instance (EFI) Profile.
When you receive an email that an employee has submitted a New FMLA Leave Request
There are 2 options to access the new FMLA Requests:
- Click on the link in the email notification you received to access the Main Menu dashboard
- Log in to the Main Menu dashboard.
• From the Main Menu dashboard, click on the “FMLA Requests” button.
You will see the employee’s request who is referenced in the email in among the employees listed.

Note: If the Employee selects "Other" as a leave reason.
If an employee selected “Other” as the reason for the leave request, in all likelihood the reason for the leave request is either due to the employee’s own serious health condition or to care for a covered family member (parent, spouse or child) with a serious health condition. If so, contact the employee and ask them to resubmit the leave request with the correct reason selected. Similarly, if an employee selects another incorrect reason for their leave request, ask the employee to resubmit their request and delete the employee’s existing leave request that lists the incorrect reason in the “Action” column.
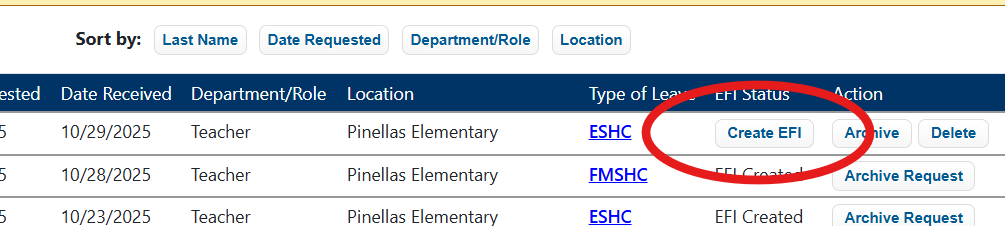
Create EFI: In the column under EFI Status.
Here you will process the leave request to assign Eligibility and Assign Weekly Work Hours.
Click Create EFI.
To complete the setup of the Employee’s EFI Profile, enter the information in the remaining required fields (indicated by a red asterisk).
Enter Weekly Work Hours:
Enter the employee’s regular weekly work hours under Weekly Work Hours. This is the basis for the Track Leave Feature that lets you track the actual leave of the Employee.
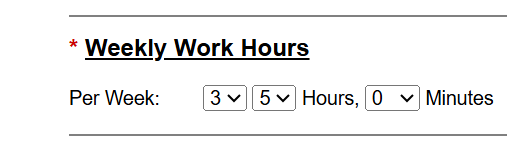
Weekly Work Hours: The number of hours is calculated in FMLA. The number of weekly hours will determine the total number of hours that the Employee receives for FMLA, which can be monitored in eFMLA.
Number of Weekly Work Hours x 12 Weeks = Total Number of Annual FMLA Leave Hours
Real Example: Employee Works 35 Hours Per Week.
35 hours x12 weeks = 420 Hours Total FMLA Leave
FMLA Eligibility Section. Scroll down and click “Yes” or “No” next to each of the three criteria under the “FMLA Eligibility” Section.

Note: The first two eligibility criteria are defaulted to “No,” the third criteria is defaulted to “Yes.
What if the Employee is NOT Eligible? If any of the Eligibility Questions are No, the Employee is not Eligible for FMLA. You must still send the Employee the Eligibility Notice, informing them of why they are not Eligible and what they need to become FMLA Eligible.
State Family/Medical Leave Status
If your organization is in a State that has a state specific family/medical leave law, you can indicate whether the employee meets the States eligibility criteria under the “State Family/Medical Eligibility Status” Section. If this Section does NOT appear, then your State currently does not require employers to provide a family/medical leave benefit that is different from the FMLA. If there are specific state family/medical leave laws that apply, there may be eligibility questions specific to your State that are required (e.g., Connecticut, Georgia, Illinois, New Hampshire, South Carolina).
d. Optional: Upload a Job Description.
Note: A job description can be uploaded to the employee’s profile at a later time. The job description also can be attached to the various FMLA forms (e.g., the medical certification form and the fitness-for-duty/return-to-work form).
Key Employee Status: Answer the question under the “Key Employee' Status” section.

Optional Employee Substitute or Replacement Employee - Add name of the Employee

Optional - Notify Supervisors or others: If you wish to notify the employee’s supervisor and/or other individuals that the employee has requested FMLA leave (along with the dates of leave, if applicable), click on the checkbox next to each individual’s name. An standardized email will be sent to each individual notifying them of the employee’s leave request.
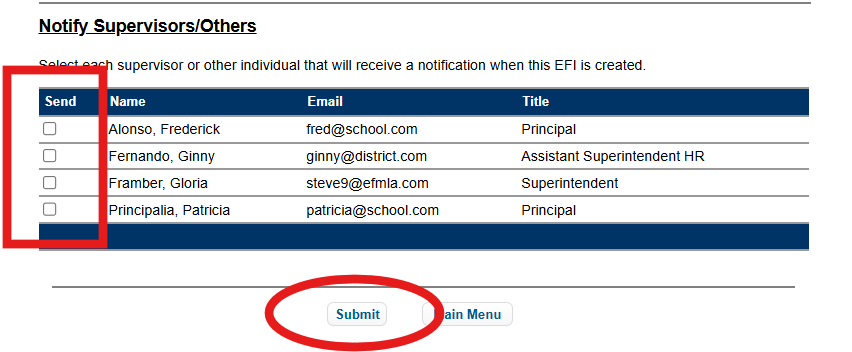
Click “Submit.” If you have completed all required fields, you will see a message in a light green rectangular box indicating that you have successfully created a new EFI Profile.
Go to Employee’s EFI Profile - Follow the instructions on that page to access the Employee’s Profile and complete the FMLA forms (click on “Go to Employee’s EFI Profile” at the bottom of the page

Note: Once an employee request has been processed and the EFI profile has been set up, Archive the employee’s Request in the “Action” column in the Employee FMLA Request Report

Find an Employee who's FMLA Request has already been processed.
You can access the employee’s EFI profile in the “Employee Profiles List.”

STEP THREE: Create Eligibility and Rights & Responsibilities Notice to be Sent to the Employee
When you are in the Employee’s EFI Profile page:
• Complete the Eligibility Notice by clicking on the “Not Done – Create” button next to “Eligibility Notice."

A summary page will appear with an overview of the Eligibility Notice (EN).
Scroll down and click Continue” to proceed to the Eligibility Notice (EN) form.
• Section I: Notice of Eligibility
Section I of the Eligibility Notice will be fully completed if the employee meets the FMLA eligibility criteria for FMLA leave. If so, simply scroll to the bottom of the page and select “Continue” to proceed to Section II.
If Employee is not Eligible:
If the employee does not meet the eligibility criteria for FMLA leave, enter either the approximate number of weeks the employee has worked (or will have worked) for your organization and/or the approximate number of hours the employee has worked (or will have worked) for your organization during the 12-month period preceding the scheduled leave start date.
Note: If the employee does not meet the eligibility criteria for FMLA leave, the Rights & Responsibilities portion of the notice will not appear because it is not applicable. In those situations, indicate in the textbox what options the employee has for taking leave, if any.
• Section II: Additional Information Needed
Certification of Health Care Provider for Employees Serious Health Condition
Section II is defaulted to require additional information from the employee in the form of a certification or other documentation. Enter the Date that the Certification is due.

If you do not need additional information, change the defaulted selection to the top option (informing the employee that you “do not need any additional information”) and click “Continue” at the bottom of the page to proceed to Section III.
Note: The type of certification an employee needs to submit will be automatically selected based on the reason for the requested FMLA leave. The selection “is enclosed” also will be preselected. There is no default selection if the reason for the leave is birth of a child or placement of a child for adoption/foster care. In the case of birth of a child, the applicable medical certification could be (a) the employee’s own serious health condition (for the birth mother), family member’s serious health condition (if the spouse has requested leave to care for the birth mother during pregnancy or recovery from childbirth), or (c) neither (if the birth mother’s spouse or non-spouse parent is requesting leave to care for/bond with a newborn child). Select the applicable certification form if (a) or (b) applies, or change the selection to the top option (informing the employee that you “do not need any additional information”) if (c) applies or if your organization does not require a medical certification form from an employee who is expecting a child.
In the case of placement of a child for adoption or foster care, no certification can be required.
• Section III: Rights and Responsibilities
Certain checkboxes in Section III will be preselected based on the Eligibility Notice template selections in your Account Profile Menu. Modify as needed by checking or unchecking an checkboxes as applicable to a particular employee.

• After completing the Notice, click “Finish” at the bottom of the page. If not changes need to be made, click “Return to Profile” at the bottom of the page.

STEP FOUR: Create Medical Certification Form
• Complete the applicable Certification Form. For example, if the FMLA leave is being requested for the Employees own Serious Health Condition, click the “Not Done – Create” button next to “Employee’s Serious Health Condition.” If the FMLA Leave is for a Family Member's Serious Health Condition, that button will be available.

Note: Certain certification forms will or will not be available depending on the reason FMLA leave is being requested. For example, if the reason for leave is the employee’s own serious health condition, only that medical certification will be available. If the reason for leave is to care for a covered family member, only that certification will be available. If the reason for leave is birth of a child, both medical certifications will be available. If leave is for birth of a child, use the Employee’s Serious Health Condition form for the expectant mother, and Family Member’s Serious Health Condition form for the mother’s spouse only if the spouse is seeking FMLA leave to care for his or her spouse for pregnancy or recovery from childbirth. If the spouse or non-birth parent is seeking leave to care for a healthy newborn, no certification may be required. Similarly, if leave is for placement of a child for adoption or foster care, no certification may be required (but other documentation may be required).
- Select the medical certification due date, the same date as you selected on the Eligibility Notice.
- If leave is for the employee’s own serious health condition, the employee’s job title and regular weekly work schedule are required fields.
-


- Whether to attach a job description is optional.
- If you wish to include the employee’s job description along with the medical certification form that is sent to the employee electronically, change the defaulted selection to indicate that the “Job Description” is attached in section number 4.
Note: If you select the option to include a job description, make sure to upload the
employee’s job description in the employee’s EFI profile and select “Job Description” to
include when emailing, make sure to select the job description as one of the documents to
send the employee.
The “Statement of the Employee’s Essential Job Functions” also is optional.
If the certification is the initial certification related to the employee’s leave request, leave “Initial Certification” selected. If the certification is not the initial medical certification being requested, select the type of certification that is being requested (e.g., recertification, second opinion).
After completing the employer portion of the medical certification form, click “Finish” to view the certification form.
Scroll down to the bottom of the page and click “Return to Profile”.

STEP FIVE: Create Cover Letter (Optional)
Complete the optional Cover Letter if desired by clicking on “Not Done – Create” next to “FMLA Cover Letter.” This option is available to provide employees with information about the FMLA notices forms that are being provided, along with any other text you want the employee to receive.
The organization’s logo and address will appear at the top of the letter.

Note: Always Create Cover Letter Last. The Cover Letter should be completed after completing any other FMLA forms or notices have been completed that will be referenced in the Cover Letter (e.g., the Eligibility Notice, the applicable certification form). if not, the system will show an error and force you to go back and complete the form specified in the Cover Letter.
o The initial text is defaulted to appear as applicable in the initial letter sent to an employee. Deselect (“Do not include”) this option for subsequent letters sent to the same employee.
o Select standardized text to be added to the letter as applicable based on which documents (i.e., notices and/or forms) will be included with the letter to be sent to the employee.
Indicate Which Forms to Send: Click yes to indicate which Items are to be sent.

Add salutation and click Continue.

Note: Standard language can be added to the cover letter that will appear in all cover letters if desired. To insert standard language, click on “Account Profile Menu” from the Main Menu and access the “Create Global Cover Letter Info” to insert the text.

Now Go back to Employee Profile to Send the Forms to the Employee.
Click the Email Employee Forms/Files Button

Now Select the Forms to be sent to the Employee.
Indicate Yes on the Forms that you would like to send
Here we are sending the Cover Letter, Eligibility Notice, the FMLA Policy
and the Employees Serious Health Condition.

You are able to copy Supervisors or Department Heads or other.
You are able to provide other documents to the Employee.
Click send.
The Employee will receive an email, be prompted to create a password to login to see the Forms and notices.

STEP SIX: Create Fitness for Duty/ Return to Work Form (Optional)
• If leave is being taken due to the employee’s own serious health condition, complete the optional Fitness for Duty/ Return to Work Form if desired. You may also send this at a later date when deemed necessary.

FMLA Practice Tip: The FFD/RTW form may not be necessary in all situations involving medical clearance for an employee to return to work: If the employee’s healthcare provider releases the employee to return to work without any medical work restrictions (i.e., to full duty), then a simple doctor’s note to that effect is usually sufficient and can be uploaded into the employee’s EFI Profile under “Misc Files.” However, if there are any work restrictions, then it is important to know the nature of the restrictions in relation to the essential functions of the employee job.
STEP SEVEN: Send or Print Notices, Forms, Other Documents
The preferred method to deliver leave-related notices, forms or documents to an employee is to email them through the eFMLA system, which keeps a record each time such a document (or email) is sent to an employee in each employee’s “Sent Email History.” Alternatively, any and all documents can be printed by clicking on the “Print Forms/Notices & Documents” button in an Employee’s Profile. However, if you print and deliver documents to an employee, we recommend that you put a note to document the method of delivery date sent/delivered in the Notepad in the employee’s EFI Profile. In addition, you may wish to email the documents to the employee on the same date so that there is a record of delivery in the eFMLA system for FMLA recordkeeping/compliance purposes.
• Send the eFMLA forms to the employee by clicking on “Email Notices/Forms & Documents” form
the employee’s EFI Profile:

(1) Select the eFMLA forms you would like to send:
- Eligibility Notice
- Serious Health Condition form
- Cover Letter (optional)
- FMLA Policy (optional)
- Job Description (optional)
- Return-to-Work/Fitness-for-Duty Certification (optional)

(2) Select or add any individual(s) whom you would like to copy (CC) on the forms from the list, or add and email addresses as needed. To add individuals to the CC list to appear each time, simply add them to the CC Email Address List in Account Profile Menu > Manage Email Notifications
Note: Generally, it is not necessary to copy other individuals who work in your organization on the above-listed documents, and the eFMLA system blocks any copied individual from viewing any employee’s medical certification form(s). You may wish to copy other individuals on the Notice of Designation that is completed in Step 8 below since the Designation Notice contains more pertinent information regarding whether the employee’s FMLA leave has been approved and, if so, how much leave has been approved, and whether a Return-to-work/Fitness-for-duty certification is required from the employee as a condition of restoration.

(3) Select any optional miscellaneous documents to include, and
(4) Add any text to the email.
- Click “Send” at the bottom of the page.
- Click “Employee Profile” to return to the employee’s EFI Profile.

Note: The eFMLA system enables the employee to complete their portion of a medical certification form and forward it electronically to the employee’s or covered family member’s health care provide to complete the certification form electronically. If so, the FMLA administrator will receive an email that the certification has been completed. If the health care provider is unwilling or unable to complete the form electronically, the employee can print the form or fax it to the health care provider directly through the eFMLA system. An FMLA administrator also is able to fax a certification form directly to a health care provider by clicking on “Send as Fax” at the bottom of the certification form itself.
Upload Certification Form(s) - Faxed, Hard Copies, Paper Copies
If the employee provides a hard copy of the completed form, or if health care provider faxes the form to your organization directly, scan the form to your computer or network and upload it into the eFMLA system by clicking “Upload” next to the applicable certification in the employee’s EFI Profile.

Select the file to upload, along with the date the certification was received and click “Submit.”
The EFI Report will be automatically updated to reflect the date on which the certification was received. In addition, the employee will receive an email notification that the certification has been received and will be able to view the certification form by logging in to their Employee Dashboard
IMPORTANT NOTE: IF YOU DO NOT SEE THE UPOAD BUTTON...
If you have not created a certification form in eFMLA, click on the “Not Done – Create” button to create one so that you can access the Upload button to upload the medical release.
You do not need to email the certification form to the employee unless you require information from the employee’s health care provider regarding any medical work restrictions.
eFMLA Process Tip: Uploading Document to the Correct Place
Make sure to upload the medical certification received by clicking on the button next to the name of that particular certification. Once entered, eFMLA will generate a confirmation(s) to the employee/administrator/healthcare provider and populate the EFI Report (see screen shot above).
Uploading Files to the "Misc. Files" Conversely, any document(s) uploaded under the “Misc. Files” button has no effect on the EFI Report and will not generate an email notification to the employee (see screen shot below). Use the Misc. Files Upload button to upload documents other documents related to the employee’s leave (e.g., completed workers’ compensation or short-term disability claim forms).
STEP EIGHT: Complete and Send the Designation Notice
Once a certification form has been received (or other documentation verifying the need for FMLA leave), complete the Designation Notice.
To complete the Designation Notice:
From the Main Menu, click on “Employee Profile’s List” to access the employee’s EFI Profile.
- Click on the “Not Done – Create” button next to “Designation Notice” in the employee’s EFI Profile to complete the form.

- Scroll down and check the box to agree to the acknowledgement.
- If you have received medical certification or other documentation to support the need for leave, click “Yes” and enter the date on which the documentation was received.
- Enter ONE option under the section “We have decided that:”

Note: The three most common selections on the Designation Notice are (1) to “Approve” the
FMLA leave request, (2) to “Not Approve” the FMLA leave request, or (3) to seek “Additional
Information” to determine whether to approve the FMLA leave request. It is advisable to review a
medical certification form carefully to make sure it is “complete and sufficient”—i.e., that the Health Care Provider who completed the form responded to all questions posed and that the responses are not vague or ambiguous. If not, the FMLA administrator should select the third option to seek additional information/clarification.
• Click “Continue” at the bottom of the page. Unless you selected “Additional information is needed o determine if your leave request qualifies as FMLA leave,” Section II is inapplicable. Scroll to the bottom of page and click “Continue.” If additional information is needed, click the applicable textboxes under “Incomplete or Insufficient Certification” indicating what information is needed and the due date for the employee to submit the additional information.
• If additional information is not required, complete Section III:
o If the employee’s leave is scheduled, select that radio button and indicate the amount of leave that will be designated as FMLA leave.
o If the employee’s leave is unscheduled, select that radio button.

o Paid/Unpaid FMLA Leave Check all applicable checkboxes in the “Paid/Unpaid FMLA Leave” section.

o Return-to-work Requirements Check all applicable checkboxes under “Return-to-work Requirements.”

• Click Finish After completing the Designation Notice, click “Finish,” and after reviewing the completed Notice for accuracy, click “Return to Profile” at the bottom of the screen.
FMLA Practice Tip: If Additional Information is needed from the health care provider, it is recommended that you create a new certification for the health care provider to complete from scratch in the employee’s EFI Profile and keep the original certification in the employee’s EFI Profile so that for recordkeeping purposes you have documentation of what information was missing for the original certification and can compare the two certifications as needed. Send or print and deliver the new medical certification form to the employee along with the Designation Notice to the employee.
• Send the Designation Notice and the Cover Letter to the employee by clicking “Email Employee Notices/Forms & Documents”

Select the Designation notice to send.

CC anyone with a need to know about the status of an employee’s FMLA leave request (e.g., the employee’s supervisor, and benefits/payroll employees).

Click Send
The Employee will receive the notification to login to eFMLA to review and take action, if needed.

Note: You also may prepare a new Cover Letter to send along with the Designation Notice. If so,
make sure to select “No” next to the optional first section in the Letter “Include description below:” since the text in that initial section is only applicable when sending an initial Cover Letter with the Eligibility Notice. In addition, since any information regarding the employee’s FMLA leave can be contained in the Designation Notice, a Cover Letter may not be necessary in addition to the Designation Notice. Standard language can be added to the Designation Notice that will appear in all Designation Notices automatically. To insert standard language, click on “Account Profile Menu” from the Main Menu and access the “Create Global Cover Letter Info” to insert the text.
eFMLA Process Tip: The Designation notice may be completed and sent to and employee along with the Eligibility Notice if the employer is certain that the leave qualifies as FMLA leave (e.g., if an employee gives notice of the anticipated birth of a child), with or without a certification form.
STEP NINE: Manage Employee Leave & Balance
Managing each employee’s FMLA leave can be a daunting and complex task, especially when the leave involves the use of intermittent leave for a chronic condition, permanent/long-term conditions, or multiple treatments for non-chronic conditions. In addition, if leave is for a block of time, the leave start and end dates may change (e.g., for the anticipated birth or placement of a child, surgery date, recovery period, etc.).
• Manage anticipated/actual start dates and return to work dates: If an employee informs you that their anticipated leave start date or return to work date has changed (or the actual start date or changes), access the employee’s current EFI Profile and edit the date(s) as needed by clicking on the ‘Edit Employee Profile’ button.
• Enter notes into the NotePad to document conversation(s), communication(s) with a healthcare provider, or other information related to the employee’s leave (e.g., that an employee’s return to work date has changed).
Employee Reports - View the EFI Report
On a regular basis (weekly, if not several times each week, depending on the size of your organization), click on “Employee Reports” from the Main Menu and then click on “EFI Report” to view and monitor the status of information each employee’s open EFI Profiles, such as eligibility for federal FMLA and any applicable state family/medical leave, certification due dates and whether the applicable certification has been received, leave start and anticipated return-to-work dates, and whether the employee has returned to work. Each of the columns can be sorted in order or reverse order by clicking on the arrows in any of the column headings. In addition, you can download this report into CVS or PDF format.
Note: When downloading this report, each employee’s Department/Role and work Location
will be included on the downloaded report.
Employee Reminder Report: Send Certification Due Reminders
Periodically, (e.g., once or twice a week, or more often based on the number of employees with open EFI’s), click on “Employee Reports” and then click on “Employee Reminder Report.”
• Select “All” from the “Show” dropdown list above the Employee Name column.
• Click on the arrow in the “Cert Due Date” column to sort in chronological order. Click on the arrow again to sort in inverse chronological order.
• Send a reminder to each employee whose certification is past the due date or about to be due.
Note: Each time a reminder is sent to an employee, the date on which the reminder is emailed is tracked in the employee's EFI Profile and can be viewed by clicking on the “Email History” button. eFMLA recommends sending just one certification due reminder to an employee (not two or more reminders). The text and tense in the email the employee receives changes based on whether the due date is in the future or in the past.
Track Leave Usage for FMLA and Non-FMLA Leave
• From the employee’s EFI Profile, click on the “Track Leave” button under the Notepad.

The screen below will appear. To enter a block of leave, reduced schedule or intermittent FMLA leave, click “Enter a block or Intermittent Leave”. To enter a day or partial day of FMLA or non-FMLA leave, click on “Enter a Day of Less of Leave” button.

1. Enter the number of daily scheduled work hours the employee will be (or was) on leave during most of the leave period (e.g., a full workday might be 7 hours, 7 hours and 30 minutes or 8 hours, and a half workday might be 3 hours and 30 minutes or 4 hours for reduced schedule leave).

Note: Full weeks or more during which the employer’s operations have ceased (e.g., during the
Christmas holidays or spring break for a school system) can be deselected from the calendar after clicking on the “View Results” button in Step 5. In addition, individual variations in the number of daily leave hours or concurrent leave type can be adjusted at a later stage of this process. Conversely, you can enter two separate blocks of leave if the break is lengthy (e.g., semester break for a university or summer break for any educational system).
2. Select the type of concurrent leave type that an employee will use for all or most of the from the dropdown menu.
Note: Individual variations in the concurrent leave type can be adjusted at a later stage of this process. Leave also may be designated as “Non-FMLA leave” at a later stage of this process (e.g., for leave that extends beyond the 12-week FMLA leave entitlement period or for an employee who does not meet the FMLA eligibility criteria).
3. Enter the start and end dates for the leave for a continuous block of leave or reduced schedule eave. If entering multiple intermittent leave dates taken during a particular week or several weeks, enter the same date for the start and end dates. Additional intermittent leave dates can be selected from the calendar at the next step of the process.
4. Check the box next to “Include Weekends” only if the employee is scheduled to work on weekends.
5. Click the “View Results” button. A calendar will pop up with the selected start and end dates (and all dates in between) highlighted in blue. You can click on any date to add or delete the date as one on which the employee is taking (or took) leave. For example, you can deselect a week or more of leave dates to account for a shutdown during the holiday season or spring break.
6. Click the “Submit Results” button.
On this screen, you can fine tune the details of the days off.
(a) designate a date, multiple dates, or “Select All” dates of leave on the list as “Non-FMLA” leave;
(b) change the amount of leave time on any particular date or multiple dates; and/or
(c) change the concurrent leave type for one or more dates listed.
Last: Finalize Dates:
After making any needed changes on the above screen, click the “Finalize Dates” button at the bottom of the screen. You will see the total number of hours of FMLA leave remaining, the total number of hours of FMLA leave used, and the total number of hours of FMLA leave and non-FMLA leave combined, along with the daily usage of leave. This screen will update on a daily basis based on your 12-month calculation method.
WATCH VIDEO BELOW ON HOW TO MANAGE & TRACK LEAVE
STEP TEN: Manage Return to Work Email Reminders
Send Return-to-Work Reminders
Periodically, (e.g., once or twice a week, or more often based on the number of employees with open EFI’s), click on “Employee Reports” and then click on “Employee Reminder Report.”
• Select “All” from the “Show” dropdown list above the Employee Name column.
• Click on the arrow in the “Anticipated RTW Date” column to sort in chronological order. Click on the arrow again to sort in inverse chronological order.
• Click on “Send” to send a reminder to each employee who is scheduled to return to work from a continuous block of leave over the next few days or calendar week or two.
Note: Each time a reminder is sent to an employee, the date on which the reminder is emailed is tracked in the employee's EFI Profile and can be viewed by clicking on the “Email History” button. The text in the standardized email is tailored based on whether the due date is in the future or in the past (including the day on which the reminder is sent). eFMLA recommends sending a return-to-work reminder to each employee who is scheduled to return to work during the following 3-5 workdays. Under the FMLA regulations, an employee is required to inform their employer at least two days prior to the date they intend to report to work if it is earlier than previously indicated.
The text and tense in the email the employee receives changes based on whether the return-to-work date is in the future or in the past.
• Upload Fitness-for-Duty/Return to Work Certification (or doctor’s note releasing an employee to return to work) into the employee’s EFI Profile. Important note below about uploading.
You must take one step before uploading the FFD/RTW Certification
Note: In order to upload a certification manually follow these steps.
If you have not created a Fitness-for-Duty/Return to Work certification form in eFMLA, click on the “Not Done – Create” button to create one so that you can access the Upload button to upload the medical release that you need to upload. You do not need to email the FFD/RTW certification form to the employee unless you require information from the employee’s health care provider regarding any medical work restrictions.

eFMLA Process Tip: Uploading Document to the Correct Upload Button.
Upload a Fitness-for-Duty/Return to Work certification or medical release received by clicking on the button next to “Fitness-for-Duty/Return to Work” in an employee’s EFI Profile so that it will generate a confirmation to the employee and populate the EFI Report. See screen shot above. Conversely, any document(s) uploaded under the “Misc. Files” button has no effect on the EFI Report and will not generate an email notification to the employee. Use the Misc. Files Upload button to upload documents such as miscellaneous doctor’s notes (e.g., extending an employee’s leave) and other documents related to the employee’s leave (e.g., completed workers’ compensation or short-term disability claim forms). See screen shot below.
Mark Employee Returned
Once an employee returns to work from a continuous block of leave, open the employee’s EFI profile from the Employee Profiles List and select “Yes” next to the question “Employee Has Returned?” in the “Employee Status” section of the EFI Profile and enter the employee’s actual return-to-work (RTW) date.

In the “Employee Return Status” section of the EFI Profile and enter the employee’s actual
return-to-work (RTW) date. Click Update

Note: The employee’s actual return-to-work should match the anticipated RTW date listed in the
employee’s EFI Profile. If the employee notifies your organization that their anticipated RTW has
changed (as they are required to do under the regulations), change the RTW listed in the employee’s EFI Profile so that the dates match on the EFI Report. You can also require additional medical documentation to confirm the employee’s need for additional leave (including a recertification), or to confirm that the employee is medically able to return to work sooner than anticipated.
STEP ELEVEN: Close an Employee’s EFI Profile
Once an employee has returned to work from a continuous block of leave and it is certain that the employee will not need FMLA leave for the same FMLA-qualifying reason OR if a new 12-month calculation period for the employee has passed and the employee needs leave that is potentially FMLA qualifying, close the employee’s EFI by clicking on the “Yes” radio button next to “Close This Employee Instance?” to close the employee's EFI.

Be sure to click Yes, Close on the next page.

Note: Closed EFI’s will no longer appear on the Employee Profiles List or the eFMLA Reports automatically. You can show the closed EFI’s in the EFI Profiles List or on the various eFMLA Reports by clicking on “Show Closed EFI’s” in any of the reports.